Monday, October 31, 2011

New wind vane calibration

In the second post of this blog, I described a rather complicated method to calibrate the Raymarine ST60+ wind vane transducer. I have now identified a simplified and more robust way to do the same.

The following figure illustrates the interface between the Raymarine transducer and the microcontroller.  With the regulated supply voltage now reduced from 8 to 7.25 V, the wind vane produces 2 analog signals (the green and blue wires), varying between 2.4 and 4.8 volts.


The analog signals are fed directly to two ADC (analog-to-digital) pins of the microcontroller. The microcontroller uses a 5 V volt reference to convert the signals to a number ranging from 0 to 1023.

This is the form of the signals produced when the vane is rotated through a complete turn from 0 (wind from the front of the boat) to 360 degrees, clockwise from above.


When the mast was down (instead of climbing up there), I manually rotated the vane and recorded the blue and green ADC signals at several angles around a full turn, first clockwise and then counterclockwise.

Then the green/blue pairs are graphed as X,Y points in Excel.


This may look like a circle, but it is in fact a slightly eccentric ellipse, with its axis tilted, and its center slightly off the main diagonal. The next step is to find the equation of the ellipse that best fits these points. For this step, we use the NLREG software which has a convenient example of fitting an ellipse to data points.

Using the NLREG software, we obtain the following characteristics for the fitted ellipse:

     Parameter        Final estimate
------------------  ------------------ 
           Xcenter           741.363842     
           Ycenter           744.69208
           Tilt Angle (T)    1.86167052 radian
           Xdim               243.159241
           Ydim               249.288046
 
The calibration technique consists in mapping the ellipse to a circle centered at the origin (0,0). For each green/blue measurement pair (x_green, y_blue), the apparent wind angle can then be calculated by the following procedure.


The equation reduces to:


And the measured apparent wind angle can be calculated as:


Friday, October 28, 2011

Hi-Resolution Custom Compass

I have completed the assembly of my custom compass.


As explained in a previous post, it has a resolution of better than 0.1 degree, and calculates a new tilt-compensated heading more than 10 times per second.

To achieve the output rate of 10 Hz, the compass makes use of 3 MicroMag3 magnetometers working in parallel, each one being responsible for only one axis. In the following figure, the active coil of each magnetometer is marked by a red circle.


I came to the conclusion that a gyro is not needed in a marine compass, as the rate of turn can be calculated from the calibrated output of a fast compass.

The final accuracy of a compass depends entirely on the quality of the calibration, that will be completed as described in the last 3 posts.

After that, I will make comparative tests between this compass and the Airmar H2183.


UPDATE: Some test results


Here is a graph comparing the calibrated output of both compass during a short test run (click on the figure to zoom in). The Airmar H2183 is in blue, and the Hi-Res is in red. Each horizontal division is 0.1 second, so that this excerpt covers around 2 minutes. Over the extended test run that had a duration of 6 minutes, the average difference between the 2 compass has been 0.1 degree. The H2183 seems to overreact somewhat to changes in heading and may thus require more damping. This is also evident from the calibration test run (http://sailboatinstruments.blogspot.ca/2012/06/compass-calibration-on-water.html). I did not found the time to test the instantaneous readings during a typical tack as planned, this will be for next summer. Bottom line : quality of calibration is much more imporant that anything else.


Monday, October 17, 2011

New tilt compensation

To calculate a tilt-compensated magnetic heading, we start with x-y-z raw measurements from the accelerometer (arx, ary, arz) and from the magnetometer (mrx, mry, mrz).

First, we need to find the orientation of the magnetometer reference frame (ax, ay, az) in the gravitational field.

This is given by:


The 3 correction matrices and the 3 bias values have been established during the calibration process. The 3 matrices can be pre-multiplied in order to simplify future calculations.  For the example presented in the last 2 posts, the equation reduces to:


We then normalize this result:

We now calculate the calibrated magnetometer values (mx, my, mz):

For the example presented in the last 2 posts, we have:


And finally, the tilt compensated heading is given by:


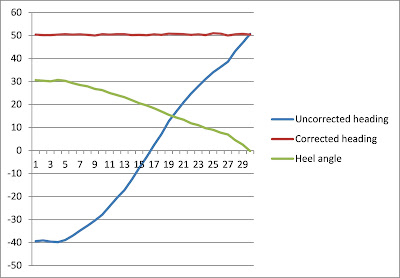
In the following example, the compass base is tilted on its side to produce a heel angle of around 30 degrees, and then slowly comes back to horizontal, as shown by the green curve. This produces a huge variation in the uncorrected heading (the blue curve). The tilt compensation does an excellent job, as the red curve is truly horizontal.


To see the improvement of the calibration, compare with the similar example appearing in this older post

Friday, October 14, 2011

New magnetometer calibration

The magnetometer calibration of the prototype compass uses the same arrangement that was described in the last post for the accelerometer.


In magnetometer calibration mode, when the button is pressed, 16 consecutive MicroMag3 raw measurements are sent to the serial port. A remote laptop running Hyperterminal continually saves these measurements in a text file. The compass assembly is rotated step by step around the X axis and measurements are taken after each small rotation. Then the procedure is repeated around the Y axis.

The following figure illustrates the first set of measurements taken with this arrangement, as rendered in Google Sketchup.


The resulting text file is then processed by the Magneto software to find the calibration parameters.


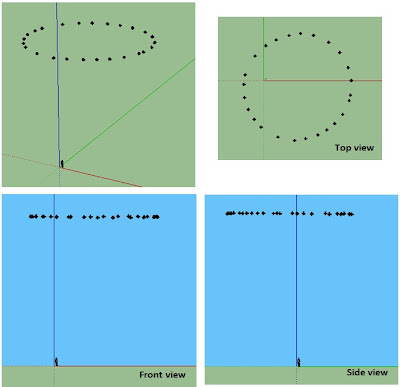
The compass base is then placed completely horizontal, and a set of measurements are made by rotating the compass assembly around the Z axis. The following figure illustrates the measurements taken with this arrangement, as rendered in Google Sketchup.


For each of these raw measured points (mrx, mry, mrz), we calculate their calibrated values (mx, my, mz).


We now want to find the equation of the plane (ax + by + cz + d = 0) that best fits these calibrated points. Using the NLREG software, we find the following equation parameters:


a = 0.0125592224
b = 0.00391778749
c = 1      
d = -3166.69898

The vector normal to the plane (vector v3) is then (a, b, c)
= (0.0125592224, 0.00391778749, 1) with a calculated norm of 1.000087.

This vector represents the orientation of the magnetometer reference frame in the rigid base reference frame.


We can thus conclude that when the orientation of the magnetometer reference frame in the gravitational field is  v3 = (0.0125592224, 0.00391778749, 1), then the orientation of the rigid base in the gravitational field is v2 =  (0.0, 0.0, 1.000087).

From the values of vectors v2 and v3, it is now possible to calculate the rotation matrix that can be applied to any vector v2 (orientation of the rigid base in the gravitational field) to get the associated vector v3 (orientation of the magnetometer reference frame in the gravitational field):


We will also need this rotation matrix later on for the tilt compensation corrections.


Thursday, October 6, 2011

New accelerometer calibration

A first prototype of a custom compass has been built, and an improved calibration procedure for the accelerometer has been tested.


The compass has 4 components mounted on a rigid base:
  • a small board featuring an ATmega128A microprocessor operating at 3.3V and 8 MHz
  • a MicroMag 3-axis magnetometer
  • an SCA3000 3-axis accelerometer
  • an NCP1400-5V Step-Up board acting as a power supply to the SCA3000.
The compass base has been fitted with wooden pegs on the X and Y axis. When supported at each end of the X or Y axis peg, the compass assembly can be rotated a full 360 degrees for calibration purposes.

Four flexible wires connect the compass to a remote 3.3 V power supply, a remote serial-to-USB converter, and a remote momentary-contact button. This configuration corresponds to the intended installation on the boat.

In accelerometer calibration mode, when the button is pressed, 64 consecutive raw measurements are sent to the serial port. A remote laptop running Hyperterminal continually saves these measurements in a text file. The compass assembly is rotated step by step around X axis and measurements are taken after each small rotation. Then the procedure is repeated around Y axis.

The following figure illustrates the first set of measurements taken with this arrangement, as rendered in Google Sketchup.


The resulting text file is then processed by the Magneto software to find the calibration parameters.


The compass base is then placed completely horizontal, and a set of measurements (64 consecutive values) is taken at this position. The average of these 64 raw measurements is:
   arx = -93.7656     ary = 61.56813    arz = 1420.344

After applying the calibration correction,


we obtain:
   aax = -0.2244         aay = 68.61544        aaz = 1332.229      (vector v1)
and the norm for these calibrated values is calculated at 1333.995, which is a comforting result.

These calibrated values describe the orientation of the accelerometer reference frame in the gravitational field.

From the calibrated values, the heel and pitch values are calculated at  -2.95 deg (heel) and 0.010 deg (pitch). These angles reflect the orientation of the accelerometer vs the rigid base.

At this same horizontal position, we conclude that the orientation of the rigid base in the gravitational field is described as:

abx = 0.0       aby = 0.0        abz = 1333.995     (vector v2)

From the values of vectors v1 and v2, it is now possible to calculate the rotation matrix that can be applied to any calibrated vector v1 (accelerometer orientation) to get the associated vector v2 (rigid base orientation) :


The technique to calculate a rotation matrix from 2 vectors is documented here.

We will need this rotation matrix later on for the tilt compensation corrections.

The next step is to apply the same calibration procedure to the magnetometer.